After posting pictures of the re-purposed bed I painted for the master bedroom, I've gotten several comments on the bedding, and one specific question regarding the fabric for the drapes I made (I mention this only because the person asking the question was a "no-reply" listing in my in-box, and I was afraid she might not get my direct reply through the comments section). Any who....I know I'm always looking for sources in the things I find inspiring, so I thought I'd share some of the details for the room here for those that might care (those that do not, I totally understand!). This post will be a long one!
I bought the feather comforter (which you can't see) and the linen duvet cover almost a year before I actually put the room together. The best price I found in my lengthy web searching was from The Company Store... I bought both the feather comforter (which is the same color as the blanket shown) and linen duvet cover there. I originally bought the comforter for the winter....thinking it would be too much in the summer. But I use it year round....I never get hot and I love sleeping under it every night. I bought the cover as an after thought thinking I might want a change from all the blue. Once I figured out how to put the comforter into the cover, I never went back!
The bedspread I bought at TJ Maxx for less than $40 for a Queen size. I bought my sheets from there as well.... 600 count cotton that is better than silk (plus you don't slide around.... just as an aside!). I have a chocolate brown set I use in the winter, and taupe for the spring/summer. Right around $45 to $50 for each set. You have to plan it right, but I live in a "rural" area and TJ Maxx is considered "da' bomb" for some of us. Our other choices are WalMart or KMart....'nuff said!
*Note: the duvet cover is 100% linen and is fully wash-n-dry-able. In fact, the more you wash and dry it, the softer it gets. It might look a little wrinkled when it first comes out of the dryer, but levels out in no time!
The bed skirt I made myself from drop cloths. Hand pleating and all! My bed sits high up on the frame (on purpose) and even if I found a skirt that I liked, the length would never have worked... from the floor to the top of the BOX SPRINGS is 20" (it's 36" to the top of the mattress. I like sleeping up high!) One heavy weight drop cloth and several hours trying to make the pleats uniform, and I had a custom bed skirt for less than $20!
The pillows on the bed are a combination of ones I made and ones I bought. The one shown above I made from linen burlap... not your regular scratchy type. This linen combination is smooth and holds up great. I made it to fit a standard 16x12 pillow form, and added a vintage coat button in the middle. The 16x16 pillow in the other picture I obviously made from fabric left over from the curtains. The long pillow behind them both is, again, Ralph Lauren from TJ Maxx.
The pillow shams are also from da' Maxx. I paid less than $20 for the pair, but honestly if you have fabric you can make them for the same or less. They are basically 2 pieces of fabric (the quilted pretty piece on top, and plain ole' lightweight muslin on the back) stitched on three sides with ties sewn on to close them.
*Tip- I take all of the pillows (other than the 4 we sleep with) off of the bed every night. I never use the pillow sham pillows for sleeping... I've seen where some people do, but I wasn't brought up that way. I buy the cheapest foam pillows I can find (usually at WalMart for around $2 or $3 dollars each) and use those to stuff my shams. If one doesn't fit right, I'll jam 2 in there to make it full (these only have one)... but that way they keep their shape and I've only spent around $12 at most on the whole set up!
And the curtains... my absolute favorite part of the room. And the one thing I spent the most on. If you can sew a straight seam, you can make curtains. I have 10' ceilings in my room, with 2 windows facing outward at full length, and this odd window on one wall that's about 2' shorter. I needed approximately 20 yards of material to make the six panels I needed for the 3 windows. I ordered 25 yards to be on the safe side. I found the fabric here and got free shipping due to the amount I ordered. For less than $200 I was able to make custom draperies for three windows in the exact length I wanted.
Tip #1- Fortunately, this fabric was heavy weight- not necessarily upholstery weight, but heavy enough to hang well when put on the rods. However.... if you really want to make them hang straight and hold the gathering better, buy some cheap, round/flat, heavy fishing weights from the tackle shop and sew them into the folds on the inside right and left bottom folds of your panels. Yup! Instant professional looking draperies that cost less than nothing. Mine are hangin' like no bodies' business!
Tip #2- If you need rods, etc. to hang your mighty fine drapes on, DO NOT shop for drapery rods. They are expensive (around $20 to $30 a piece) and come in limited lengths. DO visit the home improvement store (ours is where they wear orange vests) and ask to be directed to the CLOSET DOWEL department (where you buy the wooden dowels to hang your clothes on). Same diameter, same product.... much longer lengths (that can be cut to order- no waste) and MUCH cheaper! Like $20 for all three windows!
Oh, and a tip I didn't even think of until I looked at the pictures...
Tip #3- the "finials" you see.... they would be "legs" for stools or whatever that I bought for less than $3 each (versus the $6 ones in the drapery isle). They have the same two-way screw thing (technical term) as the actual rod finials, but at half the price and much longer. I needed that length as I was a little "shy" in measuring the length of the dowel I needed! Drill a hole into the dowel, squirt some wood glue into the hole, and screw the "leg" on in. Presto!
And one of my more popular posts.... you can read all about the chest at the foot of my bed here. I use it to store my extra linen... and after all the trauma in completing it, it'll be around for a while!
Showing posts with label my bedroom. Show all posts
Wednesday
Master Bedroom Remake... The Bed
I have been wanting to makeover the master bedroom for years (when you see the "before" picture at the end of this post, you'll know why...) This is one of the afters...
About 4 years ago, I was cruising the isles of a furniture store...looking for ideas, and found the perfect set. It was white with brown edging (later...after I crawled out of my rock, I realized it was distressed) on the dresser drawers, bed posts, etc. The set included a bed frame with head & foot board, dresser with mirror and night stand. On sale, the set cost over $1400... which in my mind at the time didn't seem that bad!
Two weeks later Hurricane Irene struck the Outer Banks, taking out the only road leading south to Hatteras Village, and leaving me unable to work for the rest of the season (a minor inconvenience compared to what was happening to the residents further south).
I ended up with a lot of time on my hands that winter... and not a whole lot of money. I "window shopped" a lot during those months in every thrift and used furniture store around. I came across an antique bed in excellent condition.
They were asking $150 for the set (including rails and slats) and the woman offered it to me for $100. After an hour talking myself into it, I brought it home.
This was my first time using ASCP (Old White)... I knew nothing about "bleed through" or how to wax, or anything else. But I had the internet, and a lot of help from people willing to share their projects.
I started with the foot board. It took me a solid week and three coats of paint, but I never had problems with bleed through (thankfully, 'cause I wouldn't have know what it was or what to do). I sanded the edges where I thought they should be sanded, and all around the spindles- just kinda' winging it while trying to remember what the $1400 bed looked like.
And the waxing?? I couldn't move my arms for days! Still haven't found a short-cut for that process!
It took me over 2 weeks to finish it. But I loved it... and I loved the process (even waxing). It sat in the workshop for months, waiting for its new home. I just couldn't bring up that beautiful bed and put it in that depressing bedroom.
It would be eight months before the room was done and the bed was brought up. Many a night was spent sleeping on the mattress and box springs on the floor, with cardboard boxes for a night stand and a ladder to prop up the TV.
The wallpaper border had to be stripped, the walls primed and painted, I needed new dressers (I only had one, and it wasn't the right style), new curtains, new bedding, and the list just continued. Did I mention I wasn't working? Yeah... a little bit of a roadblock, for sure!
I took my time (for once) and did basically everything myself.
About 4 years ago, I was cruising the isles of a furniture store...looking for ideas, and found the perfect set. It was white with brown edging (later...after I crawled out of my rock, I realized it was distressed) on the dresser drawers, bed posts, etc. The set included a bed frame with head & foot board, dresser with mirror and night stand. On sale, the set cost over $1400... which in my mind at the time didn't seem that bad!
Two weeks later Hurricane Irene struck the Outer Banks, taking out the only road leading south to Hatteras Village, and leaving me unable to work for the rest of the season (a minor inconvenience compared to what was happening to the residents further south).
I ended up with a lot of time on my hands that winter... and not a whole lot of money. I "window shopped" a lot during those months in every thrift and used furniture store around. I came across an antique bed in excellent condition.
They were asking $150 for the set (including rails and slats) and the woman offered it to me for $100. After an hour talking myself into it, I brought it home.
This was my first time using ASCP (Old White)... I knew nothing about "bleed through" or how to wax, or anything else. But I had the internet, and a lot of help from people willing to share their projects.
I started with the foot board. It took me a solid week and three coats of paint, but I never had problems with bleed through (thankfully, 'cause I wouldn't have know what it was or what to do). I sanded the edges where I thought they should be sanded, and all around the spindles- just kinda' winging it while trying to remember what the $1400 bed looked like.
And the waxing?? I couldn't move my arms for days! Still haven't found a short-cut for that process!
It took me over 2 weeks to finish it. But I loved it... and I loved the process (even waxing). It sat in the workshop for months, waiting for its new home. I just couldn't bring up that beautiful bed and put it in that depressing bedroom.
It would be eight months before the room was done and the bed was brought up. Many a night was spent sleeping on the mattress and box springs on the floor, with cardboard boxes for a night stand and a ladder to prop up the TV.
The wallpaper border had to be stripped, the walls primed and painted, I needed new dressers (I only had one, and it wasn't the right style), new curtains, new bedding, and the list just continued. Did I mention I wasn't working? Yeah... a little bit of a roadblock, for sure!
I took my time (for once) and did basically everything myself.
The bed was the start...but there's a lot left to share.
Here is where I started...
![]() |
| (Before photo... circa 1998...not much changed through 2003!) |
And the After.... please check back next Wednesday for some of the details and sources.
Friday
On When You Should Listen to that Little Voice Inside Your Head...
The one that says "stop now" or "just let it go, already...", or my personal favorite "I can't believe you thought this would be easy...."
Sometimes I amaze even myself with the lengths I'll go to in order to make something look the way I want it to. I know my family already thinks I'm crazy.... and that's okay. It's when I start agreeing that I know I have a problem.
Case in point....
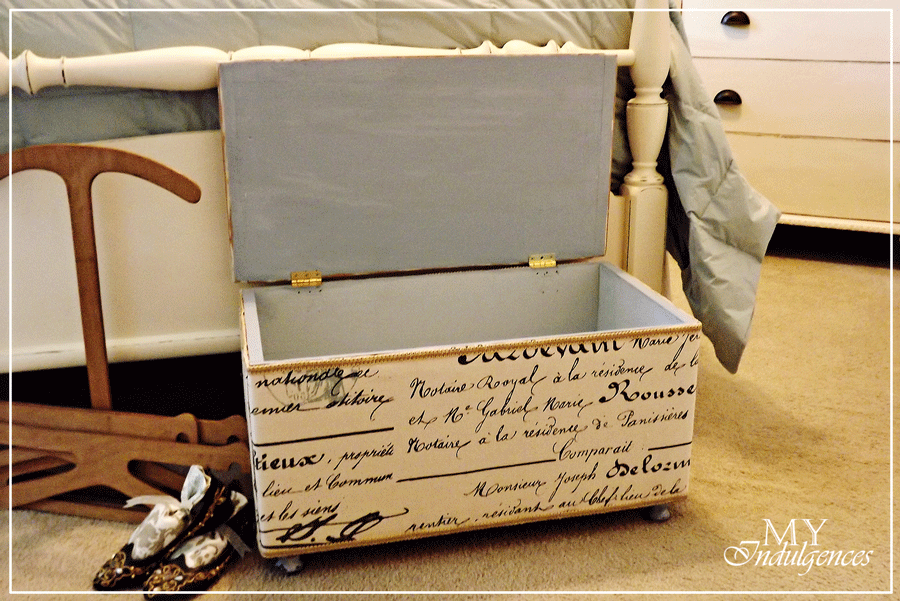
I recently finished this small trunk at the foot of my bed. I'm using it to store additional bed linen and such.
I found it at a sidewalk sale about a month or so ago, but it started out like this...
Trust me... it looks better in the picture (and that ain't sayin' much!). It had some type of sea grass/reed-ish (I know... not a word) stuff wrapped around the outside. The top & bottom of the "box" and the lip of the lid were trimmed with bamboo. My first thought was to paint the "box" portion and refinish the top with a dark stain and wax it smooth. Easy peasy...
Not so much.... After pulling off all the sea grass stuff, I was left with the glue that attached it all over the wood. No amount of sanding would ever make the surface smooth enough for paint. That's when I decided I'd cover it with fabric. That's easy enough...
And I was still planning on refinishing and staining the top. That's when I started running into trouble and my stubborn side refused to listen to the reasonable side.
After days of sanding, and wood filling, and sanding and filling again, I had to admit defeat. The wood on top was in such bad shape, that the more I sanded it "smooth" the more the top splintered. The more I sanded the bamboo trim, the worse it got. And the itty bitty pieces of "reed-ish" stuff kept popping up between the lip of the lid and the trim. Pig-headed as I am, I actually used tweezers to try and remove the little bits in between....
It's kinda' like chewing gum on your shoes.... the more you mess with it, the stickier it gets! After a week of "fixing" it, I finally lost it and ripped the trim (and five million tack nails) out. I filled all the holes left behind, and started over.
This is what I wound up with...forgive the "photo overload", but it makes me feel better!
Old White on the top (the one portion that COULD be painted...)& one of my favorite french inspired textiles on the outside.
And just 'cause I like to shake things up...
A little Louis Blue on the inside (disregard the additional holes from the numerous hinge placements.... I had to take a break from wood filler for a while!).
Next time, I'll listen to that little voice.... and just go with the flow!

Sharing this post with...
Redoux...
French Country Cottage...
Miss Mustard Seed...
Sometimes I amaze even myself with the lengths I'll go to in order to make something look the way I want it to. I know my family already thinks I'm crazy.... and that's okay. It's when I start agreeing that I know I have a problem.
Case in point....
I recently finished this small trunk at the foot of my bed. I'm using it to store additional bed linen and such.
I found it at a sidewalk sale about a month or so ago, but it started out like this...
Trust me... it looks better in the picture (and that ain't sayin' much!). It had some type of sea grass/reed-ish (I know... not a word) stuff wrapped around the outside. The top & bottom of the "box" and the lip of the lid were trimmed with bamboo. My first thought was to paint the "box" portion and refinish the top with a dark stain and wax it smooth. Easy peasy...
Not so much.... After pulling off all the sea grass stuff, I was left with the glue that attached it all over the wood. No amount of sanding would ever make the surface smooth enough for paint. That's when I decided I'd cover it with fabric. That's easy enough...
And I was still planning on refinishing and staining the top. That's when I started running into trouble and my stubborn side refused to listen to the reasonable side.
After days of sanding, and wood filling, and sanding and filling again, I had to admit defeat. The wood on top was in such bad shape, that the more I sanded it "smooth" the more the top splintered. The more I sanded the bamboo trim, the worse it got. And the itty bitty pieces of "reed-ish" stuff kept popping up between the lip of the lid and the trim. Pig-headed as I am, I actually used tweezers to try and remove the little bits in between....
It's kinda' like chewing gum on your shoes.... the more you mess with it, the stickier it gets! After a week of "fixing" it, I finally lost it and ripped the trim (and five million tack nails) out. I filled all the holes left behind, and started over.
This is what I wound up with...forgive the "photo overload", but it makes me feel better!
Old White on the top (the one portion that COULD be painted...)& one of my favorite french inspired textiles on the outside.
And just 'cause I like to shake things up...
A little Louis Blue on the inside (disregard the additional holes from the numerous hinge placements.... I had to take a break from wood filler for a while!).
Next time, I'll listen to that little voice.... and just go with the flow!

Sharing this post with...
Redoux...
French Country Cottage...
Miss Mustard Seed...
Wednesday
Hat Table B&A....
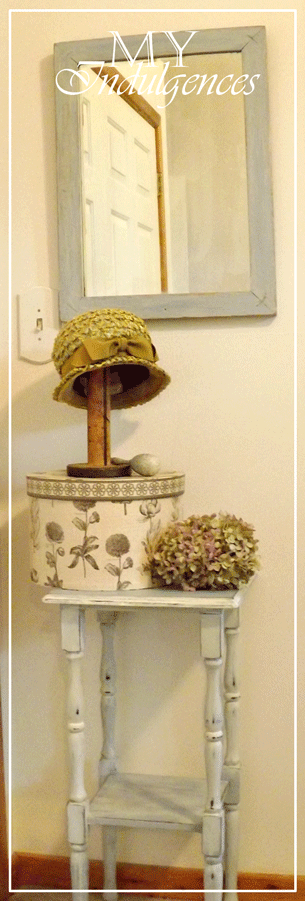
So here are the "deats" on my bedroom "hat table"...
I bought this table at a used furniture store a month or so ago...
When I first spotted it, I thought it was stained dark. After getting it home and taking it outside to clean, I realized it was a dark brown, heavy enamel paint. And apparently, it had been repaired/reconstructed at one point in time...
Stripping it was out of the question... not only would it take forever, I'm not sure what type of wood I'd be left with when I was done...
After an hour or so with the sander, I got it down to this...
Not pretty..... but pretty smooth and ready for paint. I started with a base of ASCP in Louis Blue, and added a pretty heavy wash of Old White. I'm not much of a "paint wash" or "glazer" but for some reason I went a little crazy with this piece between the layer of white and distressing it.
It took me a while to get used to it, but the more I look at it... the more I like it....
.... so much so, that I painted a mirror to match. My bedroom is coming along quite nicely. More pics to share as we go along.
Monday
A Cool Use for a Spool....
"Trend-setter" is not a term that would be applied to me... or my style of atire! I tend to stick with the classics (navy blue is my favorite color....I know BORING) and I rarely shop for myself.
My sons on the other hand.... we'll just say they dress better than I do!
That being said- I do love vintage. Hats, purses, gloves... you name it. And I actually USE the pieces as often as the occasion allows (and considering how often my man & I go out.... we'll just say I like to display them, too!) This is a vintage child's fur muff that I picked up last year.... love it & it's sooo soft!
My sons on the other hand.... we'll just say they dress better than I do!
That being said- I do love vintage. Hats, purses, gloves... you name it. And I actually USE the pieces as often as the occasion allows (and considering how often my man & I go out.... we'll just say I like to display them, too!) This is a vintage child's fur muff that I picked up last year.... love it & it's sooo soft!
I happened to stop at a new vintage clothing store on the beach a few weeks back and found the coolest hat. I've been wanting a few "new to me" accessories for my bedroom and the hat was perfect. I wanted it on a hat stand... something I could change out with the seasons. After searching around all the junk stores, antique malls and Goodwill I was coming up empty handed.
Then I saw this..... and a lightbulb went off...
Perfect and a mere $5!
And here it is serving its new purpose....
Next up.... the before & after table.
It's back to school for us starting today (how many other mothers had their children out at the bus stop 20 minutes early???? Just sayin'...you know.... in case the bus came earlier this year!)
Just ME? Have a great Monday (I'm heading out to get those school supplies!)
Labels:
my bedroom,
vintage finds
Hand Made by Me... A Beautiful Foot Stool
As I stated on my previous post, this latest project has become a much welcomed place to rest my feet at the end of the day.
It started with some recycled legs from my old bed's headboard (read here). I cut them from the frame, painted a base coat of ASCP in Old White and a top coat of Louis Blue. Then distressed the legs and waxed them to a smooth finish.
We cut a 16x16 piece of plywood and drilled the legs into the plywood from the top down into the legs... just to be sure it was sturdy. Then I just stacked the foam on top.
You can see a glimpse of the chair I made the stool for in the first picture.... although the chair itself has a high back to it, the profile of the seat is low. I had to measure the end height of the stool to make sure it wouldn't be too tall and would sit evenly with the chair's cushion. I bought what I thought was a 4" piece of 16x16 foam. Turns out, it was 4 pieces of 1 inch foam in one package.... no matter. I just stacked it up and went from there. Luckily, foam doesn't have a "smooth surface" to speak of and won't slide around.
I didn't want there to be any sharp edges to the final piece 'cause knowin' me, I'd be the one to bump my leg (or knee... or any other thing) on the side of it. To take care of that issue, I simply wrapped the foam and plywood base with a double layer of quilters batting around the peremeter.
Another double layer of batting in both directions made sure the hard edges were taken care of, and turning it upside down I was able to put my weight onto the stool itself to make sure the pillow form was held down tight.
At this point, it's simply a matter of adding your favorite fabric and you're done! Considering the only things I had to buy were the 18x18 pillow form and $8 package of foam, I basically have a beautiful, custom-made foot stool for right around $13.00. Pretty cool- stool- if you ask me!
This is also the start of the slow reveal of my winter/summer long bedroom renovation. I'll be sharing all the parts each week, so I hope you'll check back often.
And for those of us in the "tourism" industry (in whatever form.... retail, property rentals, or the food service industry) ... Chin up, friends. Labor Day is just around the corner! It's been a long (and thankfully successful) summer. Our thanks to those that continue to visit this little strip of the 'Banks!
It started with some recycled legs from my old bed's headboard (read here). I cut them from the frame, painted a base coat of ASCP in Old White and a top coat of Louis Blue. Then distressed the legs and waxed them to a smooth finish.
We cut a 16x16 piece of plywood and drilled the legs into the plywood from the top down into the legs... just to be sure it was sturdy. Then I just stacked the foam on top.
You can see a glimpse of the chair I made the stool for in the first picture.... although the chair itself has a high back to it, the profile of the seat is low. I had to measure the end height of the stool to make sure it wouldn't be too tall and would sit evenly with the chair's cushion. I bought what I thought was a 4" piece of 16x16 foam. Turns out, it was 4 pieces of 1 inch foam in one package.... no matter. I just stacked it up and went from there. Luckily, foam doesn't have a "smooth surface" to speak of and won't slide around.
I didn't want there to be any sharp edges to the final piece 'cause knowin' me, I'd be the one to bump my leg (or knee... or any other thing) on the side of it. To take care of that issue, I simply wrapped the foam and plywood base with a double layer of quilters batting around the peremeter.
That took care of the sides, but I still needed a softer cushion for the top. I bought a $5 18x18 pillow form from Walmart and put that on top. The additional inches (16 versus 18) allowed for the pillow to "smash down" onto the foam base without leaving a gap between the pillow and foam. Very important when it comes time to upholster. The combination of the two made it perfect in overall height, and I wouldn't feel the plywood when I put my feet up.
Another double layer of batting in both directions made sure the hard edges were taken care of, and turning it upside down I was able to put my weight onto the stool itself to make sure the pillow form was held down tight.
At this point, it's simply a matter of adding your favorite fabric and you're done! Considering the only things I had to buy were the 18x18 pillow form and $8 package of foam, I basically have a beautiful, custom-made foot stool for right around $13.00. Pretty cool- stool- if you ask me!
This is also the start of the slow reveal of my winter/summer long bedroom renovation. I'll be sharing all the parts each week, so I hope you'll check back often.
And for those of us in the "tourism" industry (in whatever form.... retail, property rentals, or the food service industry) ... Chin up, friends. Labor Day is just around the corner! It's been a long (and thankfully successful) summer. Our thanks to those that continue to visit this little strip of the 'Banks!
Friday
A Most Welcome Place to Rest My Feet...
Okay... so if you were wondering what became of the feet to my old bed.... (posted here) take a look....
A set of "gams" to be proud of....( how many of you recognize the slang.... and how many of you are all "huh???").
If you're interested in how to make a "rest worthy" footstool of your own, I'll be posting the details on Monday.
But for now.... I'm grabbin' my Nook and puttin' my feet up! Hope you all have a wonderful weekend.
Subscribe to:
Posts (Atom)